Looping through RestAPI calls in Action Rivers.
Rivery’s Action Rivers combined with Logic Rivers allow for the dynamic activation of RestAPI endpoints with the ability to loop through a specified variable in the workflow and make sequential API calls to GET data into a Logic River workflow or POST/PUT data to an endpoint.
In this guide we will showcase how to utilize this powerful functionality to enrich your Logic River workflows.
Step 1)
Follow the instructions in this guide to create an Action River with parameterized fields in a RestAPI call.
Step 2)
Click on the “Create New River” option on the top right corner of the console and select “Logic River”.
Step 3)
Give the Logic river a Name and Description and go to the “Logic Steps” tab. Here, select the SQL/Script Option, along with your desired cloud data warehouse and tables that contain the rows that you wish to loop over. Common columns that contain these rows contain various dates/times and/or account ID’s that you want to make API calls with. In the “Target” option, ensure that it is set to the “Variable” option:

Step 4)
Click the “+” button to create a new variable, give it a name and and hit “Add Variable”:

Next, you have two options:
-
Select “River Variable” if you want this variable to be accessible within the scope of this Logic River ONLY. It is the default and recommended option.
-
Select “Global Variable” ONLY if you want this variable to be accessible within any other River in your account in addition to the current Logic River. This is generally not recommended but in certain use cases might be necessary since it does not start out as Null by default when a River executes.
Step 5)
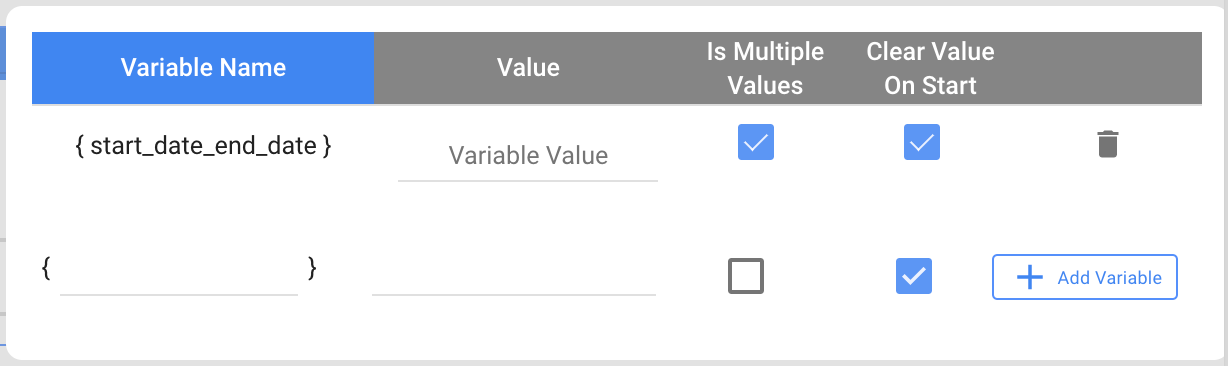
Click on the ![]() option on the right, locate the variable that you just created and check the “Is Multiple Values” option. Do not fill anything in for the “Value” column:
option on the right, locate the variable that you just created and check the “Is Multiple Values” option. Do not fill anything in for the “Value” column:
Step 6)
In the Logic River, click the “Add Logic Step” option on the bottom and change the default “SQL/Script” option to “Action” and select the parametrized Action River that you created in step (1):

Step 7)
Click the ![]() option in the top right corner and change the default “Run Once” option in the top left to “Loop over”:
option in the top right corner and change the default “Run Once” option in the top left to “Loop over”:

Step 8)
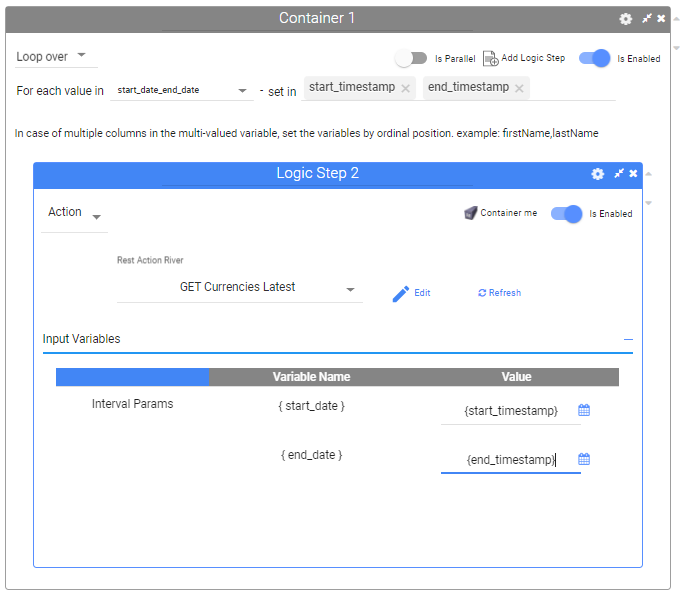
Click in the blank area besides the words “For each value in” and select the variable that you created in step (5) from the drop down menu. Click on the black space besides the words “set in” and write your desired names for the columns of the variable you created in step (5) that you wish to reference them by:

Step 9)
Click again on the ![]() button on the top right and add the names of the two variables in step (8), in this case, ‘start_timestamp’ and ‘end_timestamp’; do not fill in anything for the “Value” column:
button on the top right and add the names of the two variables in step (8), in this case, ‘start_timestamp’ and ‘end_timestamp’; do not fill in anything for the “Value” column:

Step 10)
Click on the “Input variables” option in the Action Step and write the names of the set variables encapsulated in curly braces in the “Value” column. When the river is executed, this container will make multiple calls to the Rest Action ‘GET Currencies Latest’ with parameters for start_timestamp and end_timestamp according to those stored in the start_date_end_date variable.